How to use Webpack code splitting with Vue.js
8 October 2017
I have been working with Vue.js for the past 8 months and my team and I have used different performance optimization techniques to improve the user experience. It is time to share!
Note: you can read the article without actually doing the tutorial. You can see the code on Github.
We will be using a simple project generated with vue-cli with the webpack template with only two routes (Hello and Goodbye):
We are going to talk about build tools so you will need an http server to serve static files. I will be using http-server but you can use a different one if you prefer.
When you are building a large application, the Javascript bundle can become quite large. This will directly impact the user experience because the load time will increase accordingly.
First, we need to understand how an application is built for production.
This command produces the files which are served over an HTTP server. Here is the structure:
The app.HASH.js bundle contains the application code (without the external librairies, which are in vendor.HASH.js).
We will use http-server to serve these files.
By default, http-server runs on the 8080 port. You should be able to see your application built for production here.
I am using chrome but you can do the following with nearly any browser. From the chrome dev tools, you can see the network traffic:

The index.html contains script and link tags that tell the browser to download the js and css files above.
Code splitting allows you to create chunks that are not bundled in the app.HASH.js. Instead, these chunks are loaded asynchronously when they are required. This technique is useful when your application becomes too big to be served as a single file, or when you have a lot of content which will probably not be used by your users.
Let’s get back to our example. Let’s pretend that our Goodbye component is huuuuuge and we need to split it out.
Webpack provides a code splitting feature which allows you to create chunks which can then be loaded on demand. We will use:
- the dynamic import Webpack feature to split the code into its own chunck
- the Async Components feature to load the component asynchronously
Change your src/router/index.js with this new content.
And that’s it. Instead of using a standard import, we define Goodbye with an arrow function which returns a promise (import returns a promise). Now let’s see the difference with the application built for production.
First, remove the old build:
Then rebuild the application:
Note that there is a new Javascript file in the output:
The 0.HASH.js is the chunk which contains the goodbye component.
Load the application and compare the network.
When you load the application you can see this network:
First we can note that the app is slightly lighter (-0.5 kb) because it does not contain the Goodbye component. Now if we click on the goodbye link, here is the network:
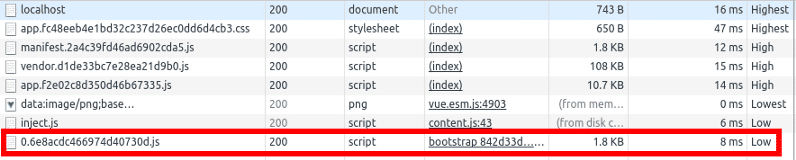
The chunk is loaded asynchronously. This is how code splitting works.
Now, as your application grow, you will have more and more async components. Imagine that you have a process which uses 2 routes, the /foo route and the /bar route. You can group the 2 chunks into the same chunk using named chunk. Let’s try this.
First we need to setup your project with more async components:
Note: If you are not actually doing the tutorial you can check the source on github.
Remove the old build and rebuild the application:
As you can see, there is 3 chunks (0, 1, 2).
Now we will use a special parameter for webpack: webpackChunkName.
Change your src/router/index.js with this new content.
Now if you rebuild your application, you can see that there are only two chunks:
- One with the Goodbye component
- One with the Foo and the Bar component
If you want more information on the topic, you can check the official documentation.

Expert technique
Comments
